
How to Create a Child Theme in WordPress
Although the WordPress theme market is filled with some pretty great choices, finding a pixel-perfect theme for your WordPress site can be a daunting task. There is always that one element – color, background, font, sidebar – that you could do without.
Child themes make it easy for webmasters to modify a theme’s file without risking losing the changes. In fact, child themes are the recommended way to make modifications to your WordPress site.
With this in mind, in this article, we’ll tell you everything you need to know about child themes and walk you through a tutorial on how to create your very own child theme in WordPress.
Let’s get started!
Introduction to Child Themes
Child themes actively inherit the core functionality from parent themes. What it does is, it overrides the parent themes functionality and applies to child themes functionality to your website. However, a particular function is not available in the child theme, it will look into the parents theme file to find that functionality.
In a nutshell, child themes are duplicate theme files that you need to modify every time you have to add some functionality to your theme. One of the major advantages of this process is that you can achieve custom functionality without messing up the original theme file – which becomes more important when you’ve paid for the theme.
Benefits of Using Child Themes
As I mentioned above, child themes fall into best coding practices to make modifications to your WordPress site theme. They give you another chance in case you mess up the first time around.
1. Better Code Organization
In most cases, a WordPress theme consist of a few thousand lines of code put across multiple files in different programming languages. This essentially makes it difficult to keep track of every modification you make. Not only do you risk investing a significant amount of time fixing unexpected bugs, it will also require a lot of effort on your part and in the worst case scenario cost you to hire a developer.
To avoid this dilemma it’s advisable to employ child themes. This is because every functionality that you make in the child theme stays in the child theme and is easy to track. As opposed to a few thousand lines of code you’d only have to look at a few hundred lines to fix bugs.
2. No Lost Modifications
When you make changes to your parent theme file they will be lost when your theme updates. Considering developers continuously release updates for themes, it’s not a good idea to make modifications to the original theme file.
Conversely, if you choose not to update your theme, you’ll have a ton of bugs residing on your WordPress site and you may also leave your website vulnerable to external security threats which have been around for almost as long as the internet itself. Child themes enable webmasters to maintain all of the modifications that they made to the theme file.
Although most WordPress themes ship with their child themes some do not. In the next section, we’ll show you, how to manually create a child theme in WordPress.
How to Create a Child Theme in WordPress
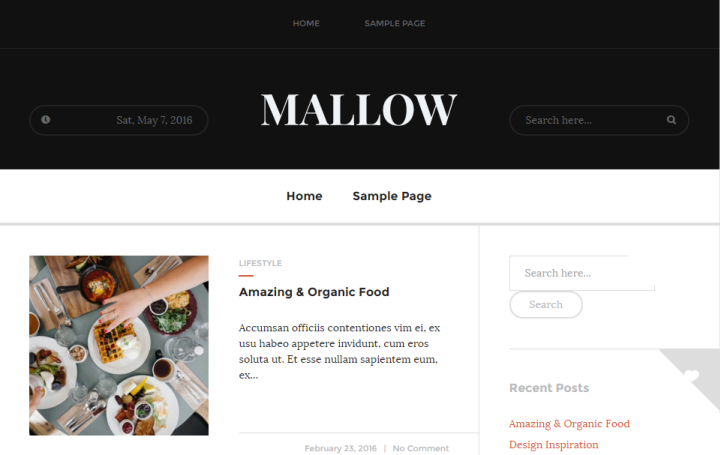
If you have found a theme that’s nearly perfect then modifying it with a child theme is super easy. For the sake of this tutorial, I will be demonstrating the process using our very own Mallow theme.
Step 1: Create a Directory
- Navigate your WordPress site’s theme directory (typically named wp-content/themes) in that folder, create a new folder and name it mallow-child.
- It’s generally considered best practice to name your child theme with the name of your parent theme with –child appended to it.
Step 2: Create a style.css File
- From your themes directory navigate to the child theme directory that you created in Step 1. In our case wp-content/themes/mallow-child.
- In this directory create a .css file and name that file style.css.
- Copy and paste the code given below in the style.css file:
/*
 Theme Name: Mallow Child
 Theme URI: https://www.yourwebsite.com/mallow-child
 Author: Rafay Saeed Ansari
 Author URI: http://www.yoursite.com/
 Description: My first child theme. Parent theme: FancyTheme's Mallow.
 Version: 2.5.0
 Template: mallow
 Text Domain: mallow-child
 Tags: black, white, red, one-column, two-columns, right-sidebar, fluid-layout, responsive-layout, photoblogging, left-sidebar, translation-ready, custom-background, custom-colors, custom-menu, featured-images, full-width-template, post-formats, theme-options, threaded-comments
 */
 @import url("../mallow/style.css");
- Click the Save button to save your changes.
If you are creating a child theme for a parent theme that is different than Mallow theme then replace mallow with the name of your child theme.
Step 3: Create a functions.php File (This Step Is Optional)
Although child themes are generally used to make CSS modifications, you can also modify the functionality of your parent theme with child themes.
- Navigate to your child themes directory. In our case, it is wp-content/themes/mallow-child.
- Create a .php file.
- Name the .php file functions.php.
- Copy and paste the code given below into the newly created functions.php file:
<?php
 //* Add custom code here
- Click the Save button to save your changes.
Note: It’s important to understand that a child theme does not require a functions.php file to work in order for its successful implementation and integration into your WordPress site. If you only intend to modify the CSS elements then you can skip this whole step altogether. With that said, if your parent theme has multiple CSS files, you will then have to create a functions.php file to include the multiple style sheets.
Step 4: Upload and Activate the Child Theme
By now you’ve successfully created a child theme. It’s time to upload it to your WordPress website and then activate it to start making modifications to your theme files.
- Right click on the child theme directory and compress it into a .zip or .rar file.
- Now log in to your WordPress website.
- From the WordPress admin panel navigate to Appearance > Themes.
- On the following screen click the Add New button to continue.
- You will be navigated to the Add Themes screen. Click the Upload Theme button.
- On the following screen click the browse button to search for your child theme’s compressed file.
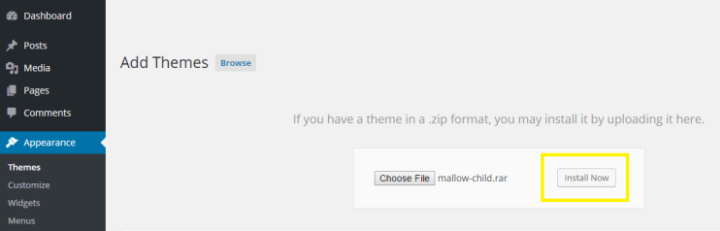
- Upload the child theme’s compressed file and click Install Now.
- Once you’ve uploaded the child theme to your WordPress website, click the Activate button.
That’s it! You’ve successfully uploaded and activated a child theme to your WordPress website.
Wrapping It Up
If you plan on giving your personal touch and feel to your WordPress website then there currently is no other way that offers you the risk-free solution to tinker with the appearance and settings to your liking apart from setting up and using child themes the way I just demonstrated. You can of course, always hire a professional to get the job done but the professional method can get really costly really fast – and understandably so – given the expertise and experience of a professional.
By following this tutorial you will have set up a child theme of your own and also be in a good position to take things further and make customizations to it without requiring aforementioned professional assistance.
If you have the time for it I would definitely recommend doing it yourself because I believe that a website owner should be accustomed and familiar with the structure and operation of their own website.
Were you able to successfully create a child theme for your WordPress website by following this tutorial? In your opinion, is it better to make modifications to your website through child themes or not? We’d love to hear from you in the comments section below so type away and let us know!

Purchasing cheap custom term papers may be a viable option for students dealing with time constraints or struggling with writing. While affordability is appealing, ensuring purchase cheap custom term papers may be strong for students facing time constraints or writing difficulties quality and authenticity is paramount. It’s crucial to research thoroughly and choose reputable services to avoid compromising academic integrity.
Purchasing cheap custom term papers may be a viable option for students dealing with time constraints or struggling with writing. While affordability is appealing, ensuring purchase cheap custom term papers may be strong for students facing time constraints or writing difficulties quality and authenticity is paramount. It’s crucial to research thoroughly and choose reputable services to avoid compromising academic integrity.
Academic essay help is essential https://speedypaper.com/blog/how-to-write-a-character-analysis-essay for students seeking guidance in crafting compelling papers. For valuable insights into content creation, click to read and enhance your writing skills.